Active Microsoft Office Ultimate 2007
Sưu tầm: http://www.softvnn.com/forum/showthread.php?t=114822
Office Ultimate 2007 bao gồm:
* Access 2007
* Accounting Express 2007
* Excel 2007
* InfoPath 2007
* Groove 2007
* OneNote 2007
* Outlook 2007 with Business Contact Manager
* PowerPoint 2007
* Publisher 2007
* Word 2007
Trước tiên download Office :
http://msft-dnl.digitalrivercontent.net/msoffice/pub/X12-30307/X12-30307.exe
Bổ xung Office Accounting Express 2007:
http://www.microsoft.com/downloads/details.aspx?FamilyID=40589aa4-f8b0-440c-b31c-064a09f8e986&displaylang=en
Sử dụng CD Key sau để setup
J67F8-BB7GM-8VPH2-8YMXP-K49QQ
Bắt đầu Active Microsoft Office 2007
Chuẩn bị:
download file sau về:
http://www.ziddu.com/download.php?uid=b66hlpStcqyim52nt6yZlJyiabCWlJWp9
Bước 1:
vào website sau để cài đặt "Genuine Office"
www.microsoft.com/genuine/office/whyvalidate.aspx?displaylang=en
sau khi setup xong Genuine Office bạn tiến hành validate cho bản Office của mình, và sẽ nhận được thông báo invallid, đừng bận tâm về thông báo đó bây giờ đóng hết tất cả các cửa sổ Internet Explorer lại
Giải nén file OGACheckControl.rar và copy file OGACheckControl.dll ( ghi đè lên file cũ ) vào thư mục :
c:\windows\system32
vào lại trang web bạn sẽ thấy thông báo đã validate thành công
www.microsoft.com/genuine/office/whyvalidate.aspx?displaylang=en
Bây giờ đừng mở bất kỳ ứng dụng Office nào ra vội vì nó sẽ bắt bạn phải Validate Key
Bước 2:
Copy file mso.dll ( ghi đè lên file cũ ) vào thư mục sau
C:\Program Files\Common Files\Microsoft Shared\OFFICE12
Ok bây giờ bạn hãy mở 1 ứng dụng Office bất kỳ ( Word chẳng hạn ) bạn sẽ nhận được thông báo Activation cho Office
hãy chọn cách đăng ký sản phẩm bằng Telephone
Next và hãy điền số 0 ( zero ) và tất cả các ô của Step 3, Next vậy là Office của các bạn đã được đăng ký thành công.
Chúc các bạn may mắn
Thứ Hai, 23 tháng 2, 2009
Tăng tốc cho Firefox
Rất nhiều người ưa chuộng Firefox nhưng lại bực mình cái tội nó chạy tốn nhiều RAM! Xin giới thiệu vài chiêu giúp bạn tối ưu việc sử dụng Firefox trên máy có cấu hình không quá mạnh.
1. Hạn chế dùng addon
Các phần mở rộng là tác nhân chính làm Firefox trở nên nặng nề và chậm chạp. Gỡ bỏ các addon không dùng đến hoặc tạm thời tắt nó đi. Tốt nhất nên chọn cài đặt từ 5-10 addon cần thiết, đồng thời luôn cập nhật phiên bản mới nhất để tránh lỗi.
2. Xóa Download History
Download History là công cụ ghi lại toàn bộ quá trình tải file. Thường xuyên làm sạch thành phần này sẽ giúp bạn phần nào, nhấn Ctrl+J và nhấp Clean Up. Hoặc có thể thiết lập để nó tự động xóa, vào Tools > Options > Privacy bỏ chọn ở dòng "Remember what I've downloaded".
3. Khởi động lại trình duyệt
Nếu chú ý, bạn sẽ thấy thời gian mở càng lâu Firefox sẽ càng chiếm dụng nhiều bộ nhớ. Chỉ cần tắt đi và khởi động lại để trình duyệt khôi phục trạng thái bộ nhớ như ban đầu. Bạn nên bật tính năng mở lại các trang đang xem vào lần dùng trước, vào Tools > Options > Main chọn Show my windows and tabs from last time ở ô When FireFox Starts.
4. Giải phóng bộ nhớ khi thu nhỏ cửa sổ Firefox xuống taskbar
Bạn có thể giảm bớt dung lượng RAM chiếm dụng khi không dùng tới FireFox bằng cách thu nhỏ (Minimize) nó xuống thanh taskbar: hãy gõ about:config vào thanh Address rồi nhấn Enter. Kế đó, bấm chuột phải lên vùng trống chọn New > Boolean để tạo một key mới kiểu Boolean có tên là config.trim_on_ minimize, gán giá trị là True. Khởi động lại lại trình duyệt và thu nhỏ xuống Taskbar bạn sẽ thấy ngay hiệu quả ( chỉ chiếm khoảng 10MB)
5. Giới hạn cache trên RAM
Khi duyệt web, FireFox sẽ tự động lưu thẳng cache lên RAM, bạn nên giới hạn dung lượng cache cho mỗi trang web. Mở about:config, bấm chuột phải chọn New > Integer để tạo key mới có tên browser.cache.memory.capacity rồi nhấp OK. Kế đó điền vào giá trị dung lượng giới hạn (đơn vị KB):
- 4096: máy có bộ nhớ RAM bằng 256 MB hoặc ít hơn.
- 8192: máy có bộ nhớ RAM từ 256 đến 512MB.
6. Sử dụng Firefox Ultimate Optimizer
Trong trường hợp các thủ thuật trên không đem lại hiệu quả như mong muốn, bạn hãy dùng thử phần mềm Firefox Ultimate Optimizer (FUO) của tác giả Felipex. Đây là một giải pháp cực mạnh giúp khắc phục triệt để lỗi chiếm dụng bộ nhớ cho “Cáo lửa”. Thử nghiệm trước và sau khi tối ưu bằng FUO đem lại hiệu quả rõ rệt. FUO phiên bản 1.0 không cần cài đặt, có dung lượng siêu mỏng (30KB) và tương thích tốt với Firefox 2.0 trở lên. Bạn có thể tải miễn phí tại địa chỉ Tuy chương trình chỉ hỗ trợ ngôn ngữ Tây Ban Nha nhưng cách dùng FUO khá đơn giản và không phải thiết lập gì cả. Mỗi khi sử dụng Firefox duyệt web bạn chạy FUO song song bằng cách kích hoạt trực tiếp file FirefoxUltimateOptimizer.exe. Nhấp chuột phải vào biểu tượng FUO (hình Firefox nhỏ) trên khay hệ thống chọn: Iniciar con Windows (chạy khi khởi động Windows), Salir (tắt FUO).
1. Hạn chế dùng addon
Các phần mở rộng là tác nhân chính làm Firefox trở nên nặng nề và chậm chạp. Gỡ bỏ các addon không dùng đến hoặc tạm thời tắt nó đi. Tốt nhất nên chọn cài đặt từ 5-10 addon cần thiết, đồng thời luôn cập nhật phiên bản mới nhất để tránh lỗi.
2. Xóa Download History
Download History là công cụ ghi lại toàn bộ quá trình tải file. Thường xuyên làm sạch thành phần này sẽ giúp bạn phần nào, nhấn Ctrl+J và nhấp Clean Up. Hoặc có thể thiết lập để nó tự động xóa, vào Tools > Options > Privacy bỏ chọn ở dòng "Remember what I've downloaded".
3. Khởi động lại trình duyệt
Nếu chú ý, bạn sẽ thấy thời gian mở càng lâu Firefox sẽ càng chiếm dụng nhiều bộ nhớ. Chỉ cần tắt đi và khởi động lại để trình duyệt khôi phục trạng thái bộ nhớ như ban đầu. Bạn nên bật tính năng mở lại các trang đang xem vào lần dùng trước, vào Tools > Options > Main chọn Show my windows and tabs from last time ở ô When FireFox Starts.
4. Giải phóng bộ nhớ khi thu nhỏ cửa sổ Firefox xuống taskbar
Bạn có thể giảm bớt dung lượng RAM chiếm dụng khi không dùng tới FireFox bằng cách thu nhỏ (Minimize) nó xuống thanh taskbar: hãy gõ about:config vào thanh Address rồi nhấn Enter. Kế đó, bấm chuột phải lên vùng trống chọn New > Boolean để tạo một key mới kiểu Boolean có tên là config.trim_on_ minimize, gán giá trị là True. Khởi động lại lại trình duyệt và thu nhỏ xuống Taskbar bạn sẽ thấy ngay hiệu quả ( chỉ chiếm khoảng 10MB)
5. Giới hạn cache trên RAM
Khi duyệt web, FireFox sẽ tự động lưu thẳng cache lên RAM, bạn nên giới hạn dung lượng cache cho mỗi trang web. Mở about:config, bấm chuột phải chọn New > Integer để tạo key mới có tên browser.cache.memory.capacity rồi nhấp OK. Kế đó điền vào giá trị dung lượng giới hạn (đơn vị KB):
- 4096: máy có bộ nhớ RAM bằng 256 MB hoặc ít hơn.
- 8192: máy có bộ nhớ RAM từ 256 đến 512MB.
6. Sử dụng Firefox Ultimate Optimizer
Trong trường hợp các thủ thuật trên không đem lại hiệu quả như mong muốn, bạn hãy dùng thử phần mềm Firefox Ultimate Optimizer (FUO) của tác giả Felipex. Đây là một giải pháp cực mạnh giúp khắc phục triệt để lỗi chiếm dụng bộ nhớ cho “Cáo lửa”. Thử nghiệm trước và sau khi tối ưu bằng FUO đem lại hiệu quả rõ rệt. FUO phiên bản 1.0 không cần cài đặt, có dung lượng siêu mỏng (30KB) và tương thích tốt với Firefox 2.0 trở lên. Bạn có thể tải miễn phí tại địa chỉ
Code:
http://www.box.net/shared/z93i3bpajr
Thứ Năm, 19 tháng 2, 2009
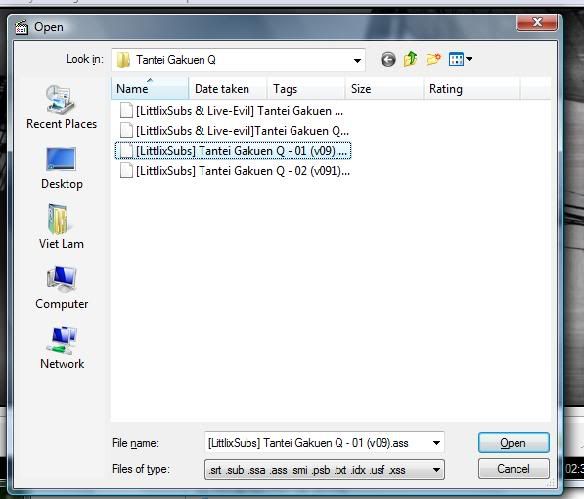
File phụ đề - Subtile files
Chuyển đổi file .idx, .sub sang .srt bằng VobSub
Use VobSub to convert it to .srt. The dvp 642 can only play text based subs like .srt. .idx and .sub are not text based files. You can use subresync which comes with VobSub and load the .idx file and then save as and choose .srt format. The only caveat is that you need to type out all the letters that it doesn't identify in the database. Search google for more info.
Use VobSub to convert it to .srt. The dvp 642 can only play text based subs like .srt. .idx and .sub are not text based files. You can use subresync which comes with VobSub and load the .idx file and then save as and choose .srt format. The only caveat is that you need to type out all the letters that it doesn't identify in the database. Search google for more info.
How to read sub files - Xem phim với phụ đề
Usually I post 2 files, one is the video file .avi, the other one is the subtitle file .srt. This tutorial is for those who wants to connect the two to watch (Thường thì Việt post 2 files, 1 file là file video gốc (.avi) không có thuyết minh, đi kèm với 1 file thuyết minh (.srt). Bài này hướng dẫn cách đọc cả 2 files.)
1. Download Media Player Classic here tại đây. Unzip, and run the .exe file. This is the program to read the video file. You only need to download once to use. (Giải nén và chạy file.exe. Đây là chương trình đọc file video. Bạn chỉ cần phải download một lần để xài, sau này không phải download hay cài đặt lại nữa.)
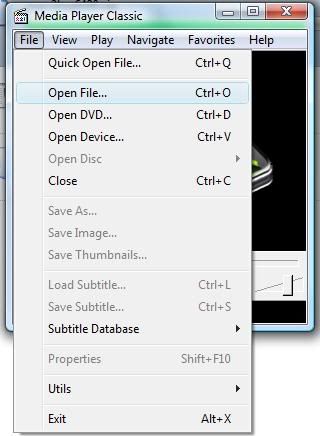
2. A new window will appear. Click on “File”, and then “Open file”. (Một cửa sổ mới sẽ hiện ra. Bấm vào “File”, sau đó chọn “Open File”.)
3. In it, choose “Browse” (Trong này, chọn Browse (ngay bên dưới chữ Cancel).)
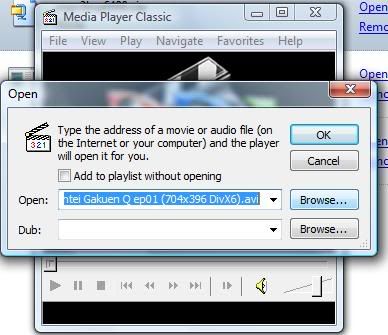
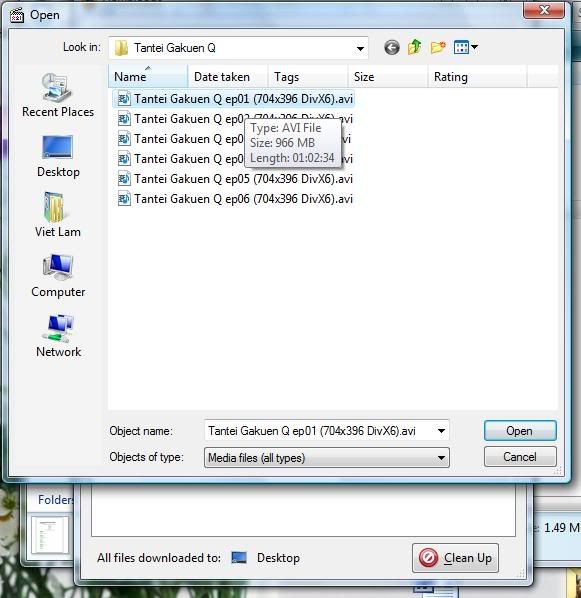
4. Show it to the video file you want to watch. Click Open. Then click ok in step 3’s window. (Chỉ đến file video (.avi) bạn muốn xem. Bấm Open. Sau đó bấm OK trong cửa sổ của bước 3.)
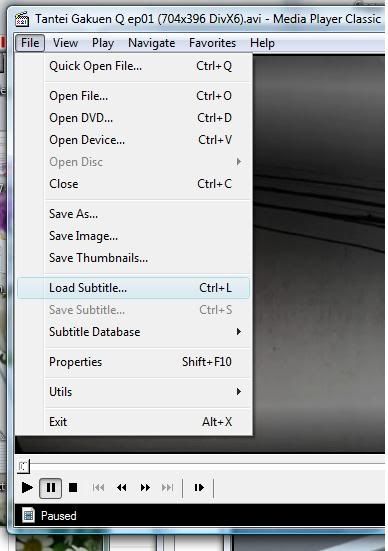
5. The video file will start running. Now you need to input the subtitle file (.srt). Click “File”, then choose “Load Subtitle”. ( File video sẽ bắt đầu chạy. Bây giờ bạn tiếp tục bỏ file thuyết minh (.srt) vào. Bấm vào “File”, sau đó chọn “Load Subtitle”.)
6. On the new window, choose the .srt file you want to watch, then click OPEN. (Trong cửa sổ mới, chọn file thuyết minh (.srt), rồi bấm Open.)
7. If the two video and subtitle files match, and if you follow the previous 6 steps correctly, you should be able to watch the video with subtitle. (Nếu cả 2 file đều đúng, và nếu bạn làm đúng cả 6 bước trước thì mọi thứ đã đâu vào đấy.)
Thứ Tư, 18 tháng 2, 2009
RapidLeech Sites
http://www.seotechvn.net/rapidleech/index.php
http://www.leechersplace.co.cc/addmyym-uitm2007290958/index.php
http://ngaynanglen.net/upgrade/index.php
http://linkgen.info/
Not tested:
http://ienima.com/1/index.php
http://effective-gaming.org/rl/index.php?act=files
http://kooldesign.net/google/index.php
http://3xrum.com/leech/index.php
http://www.grabthese.com/Rapidleech/index.php
http://www.binhthuanit.com/index.php
http://diemphim.net/rapid/index.php
http://sviet.co.cc/sviet.unn.vn/rapid/index.php
http://hydan.info/lyce/rl36idx/index.php
http://1kibou-anime.net/index.php?act=files
http://linkgen.info/index.php
http://www.badseda.com/rapidl/index.php
http://server1.lamchuyen.com/
http://server2.lamchuyen.com/
http://www.sykroken.net/forum_vbull/forum/install/pub/
RAPIDLEECH PLUGMOD RAPIDLEECH PLUGMOD RAPIDLEECH PLUGMOD RAPIDLEECH PLUGMOD RAPIDLEECH PLUGMOD Rapid & Mega R4r3 D0wnL04ds By Ind14n L33H3r - Public Leech Server RAPIDLEECH PLUGMOD RAPIDLEECH PLUGMOD .:: PHP RapidKill Pro 5.9 by Checkmate & Pramod ::. R4r3 D0wnL04ds By Ind14n L33H3r - Public Leech Server RAPIDLEECH PLUGMOD RAPIDLEECH PLUGMOD RAPIDLEECH Redirectme RAPIDLEECH PLUGMOD RAPIDLEECH PLUGMOD RAPIDLEECH PLUGMOD RAPIDLEECH PLUGMOD RAPIDLEECH PLUGMOD RAPIDLEECH PLUGMOD RAPIDLEECH PLUGMOD RAPIDLEECH PLUGMOD RAPIDLEECH PLUGMOD RAPIDLEECH PLUGMOD RAPIDLEECH PLUGMOD RAPIDLEECH PLUGMOD
How to copy Audio CD Image by using Nero
Hướng Dẫn Copy Audio CD Image Bằng Nero
Đưa CD nhạc vào ổ CD/DVD
Chạy Nero Express
Chọn Image, Project, Copy >> chọn Copy Entire CD

Source dirve: Chọn ổ CD/DVD
Destination drive: Chọn Image Recoder [CD-R/RW]

Ấn nút Copy
Ra thông báo nhập Title cho từng bài hát nhưng nhớ bỏ qua bằng cách ấn nút Cancel

Save file image

Đang thực thiện Writing to image

Ấn OK, ấn Next và thoát Nero Express

Đưa CD nhạc vào ổ CD/DVD
Chạy Nero Express
Chọn Image, Project, Copy >> chọn Copy Entire CD
Source dirve: Chọn ổ CD/DVD
Destination drive: Chọn Image Recoder [CD-R/RW]
Ấn nút Copy
Ra thông báo nhập Title cho từng bài hát nhưng nhớ bỏ qua bằng cách ấn nút Cancel
Save file image
Đang thực thiện Writing to image
Ấn OK, ấn Next và thoát Nero Express
Thứ Hai, 16 tháng 2, 2009
Tự tạo Icon cho riêng mình
 | | How to create an icon from an image? |
This tutorial describes how to make icons from images in RealWorld Icon Editor and explains how to prepare images to attain best possible results.
Reader of this guide should be familiar with basic terms related to computer images and icons as discussed in articles about computer images and Windows XP icons.
Overview
Icon is a container of several images, where each image is optimized for specific color depth and screen resolution. When creating icons from image, the task is to resample the image to specified sizes and adjust it to specified color depths.

An image with alpha channel and an icon generated from the image.
Since an icon usually has a transparent background, the conversion should either use transparency information from the source image or determine the transparency using another method.
Converting images to icons in RealWorld Icon Editor
This is a three-step process:
- Open a supported image. The application understands these standard formats: PNG, JPG, GIF, TIF, JPEG2000, TGA, PCX, PSD, and BMP.
- Activate one of the 'Create Icon' commands in 'Document' menu or in toolbar. Each command creates an icon with different effects and/or formats.
- After finishing step 2, a new window is opened. Use this window to modify your new icon and to save it.
|
|
The application comes with several preconfigured image to icon buttons. Users may add their own or modify the default ones. The customization is enabled through layout configuration dialogs.
The source image
An icon is only as good as the source image. For best results, follow these guidelines:
- Keep your source images square. The transformation will stretch source image to fit destination icon dimensions. If the source is not square, the result becomes deformed.
- Use large-enough source images. If the source is larger than 200x200 pixels, the result icon is likely to have nice smooth edges.
- The image should not have any unnecessary empty borders. Icons are small and cannot afford to waste any space.
As mentioned earlier, icons have transparent background. Best results are obtained if source images already have correct alpha channel (use an adequate file format such as PNG). RealWorld Icon Editor can create icons even from images that are missing an alpha channel, although there are additional conditions.
Images without alpha channel
If the original image does not have an alpha channel, the color of the first pixel (or a user defined color) is assumed to be background and it is considered transparent. Make sure that the background color is never used in the actual image (hint: do not use white or black as a background color). Also, avoid using images with smooth edges. If an object is mixed with background, it is virtually impossible to remove all traces of the background.
 |  | |
A good (left) and bad (right) images for image to icon conversion. The right image is too small, it has redundant empty borders, its edges are blent with background, and it is not square. | ||
 Icon created from the left image. A shadow effect was used to enhance object's outline. |  Icon from the right image is smaller than necessary, has wrong proportions, and an unwanted cyan outline. | |
Images with artifacts
If a source image is stored using a lossy image format such as JPG, it contains artifacts. Images with artifacts are not suitable, because background and foreground are mixed and the application is unable to separate them. This is similar to the problem with smooth edges.
Fixing an unsuitable source image
A raster image editor integrated in RealWorld Icon Editor can help you fix most problems with source images and prepare them for conversion to icon.
To edit an opened image, click 'Edit as Raster Image' command in 'Document' menu or on toolbar. The application window is now showing the image in edit mode. Enable alpha channel in 'Document'->'Raster Image Properties' dialog and use the Flood Fill tool to remove background manually (replace it with transparent color). Experiment with the tolerance parameter of the Flood Fill tool to remove image artifacts and/or antialiased outline.
Once the background is fixed, switch to the 'Image Viewer' layout. Activate the 'Remove Borders' operation in 'Document' menu to automatically remove empty borders and center image in the smallest square possible. The image is now ready and you may use it to create a new icon by clicking one of the 'Create Icon' commands.
Advanced features
RealWorld Icon Editor offers two unique features related to image to icon conversion.
Applying effects during conversion
Almost all Windows XP icons have some kind of shadow or outline enhancement effect. These effects, when used appropriately, give icons uniform style and improve the recognition speed by emphasizing important features of an image. It is of course possible to incorporate these effects into the source image manually, but it would be a lot of work, because:
- The effect should be similar on all icons that are used together. Therefore the size of source images should either be the same or the size of the effect must be relative to the source image size.
- Different image sizes in an icon require different effects. To get perfect results you would need to apply different effects on each generated image.
 No shadow - contours are hard to recognize. |  Simple shadow improves look and feel. |  Custom shadow for each image in an icon. |
RealWorld Icon Editor can do the above automatically. It is of course customizable and you may easily change your preferences for a single icon or on a project basis.
Optimizing pre-XP icons
Prior to Windows XP, pixels in icons were either fully transparent or fully opaque. These icons had jagged edges, because smooth edges require semitransparent pixels. These images are still present in Windows XP icons and they are used when color depth of the screen is set to Hi-Color or lower or when an icon is used on older Windows. More information in article about XP icons.
RealWorld Icon Editor allows optimizing pre-XP icons for predefined background color. These icons perform well on all kinds of light backgrounds, especially on toolbars, in menus, and dialogs. The ultimate choice is of course yours. You may enable or disable optimized pre-XP icons in the configuration dialog of the image to icon transformation.
 Standard pre-XP icon. |  Pre-XP optimization improves edges. |  Optimized icon with shadow effect applied. |

The same icons on a gray background. This is the color of Windows 2000 toolbars.
The quality of the optimized icons is getting close to Windows XP icon quality.
Conclusion
After reading this tutorial, you should know what is involved in an image to icon transformation, you should also know how to spot unsuitable images, how to fix them, and how to create icons in RealWorld Icon Editor.
This article covered only the basic techniques. If you cannot find certain feature or feel that something is more complicated then it should be, please leave your comment here or in the support forum. There is a good chance that a solution for your problem already exists.
Resources
RealWorld Icon Editor homepage:
- http://rapidshare.com/files/173653344/RWoIcEd8.1-PiChU.rar
- Pass: rslinks.org
Looking glass image from the first example.
Palette image from the second example.
Upload ảnh để lưu trữ và sử dụng trên Internet
Có một số trang ở Việt Nam cho phép bạn upload ảnh để sử dụng trên internet như là:
* http://anhso.net
* http://anhso.net
Driver corrupted / Missing code 39: mất driver CD/DVD
Triệu chứng: Máy đang chạy bình thường ,tự nhiên lúc bật máy lên lại ko nhận driver của ổ cd(dvd).
Nguyên nhân:
-Do cáp ổ bị lỗi (cũng hay xảy ra)
-Do lỗi driver (có thể do xung đột với driver khác hoặc xung đột với phần mềm hoặc mất driver)
Khắc phục: Trường hợp bị lỗi do xung đột:
Khi vào phần Device Manager, ta thấy :

Bấm chuột phải vào đó, xem thông tin ta thấy:

Những lỗi như thế này thường do ta đã cài hoặc remove 1 phần mềm nào đó.
Tuần tự làm theo các bước sau để khắc phục:
Lưu ý: Nên backup registry trước khi thực hiện!
1. Mở Registry Editor: Start > Run > gõ "regedit"
2. HKEY_LOCAL_MACHINE\SYSTEM\CurrentControlSet\Control\Class\{4D36E965-E325-11CE-BFC1-08002BE10318}
Nhìn sang bên phải và để ý thấy có 2 giá trị UpperFilters và LowerFilters

3. Xóa 2 giá trị UpperFilters và LowerFilters.
4. Restart lại máy khi đó máy sẽ nhận lại driver cho ổ CD/DVD.
Kết thúc!
Nguyên nhân:
-Do cáp ổ bị lỗi (cũng hay xảy ra)
-Do lỗi driver (có thể do xung đột với driver khác hoặc xung đột với phần mềm hoặc mất driver)
Khắc phục: Trường hợp bị lỗi do xung đột:
Khi vào phần Device Manager, ta thấy :
Bấm chuột phải vào đó, xem thông tin ta thấy:
Những lỗi như thế này thường do ta đã cài hoặc remove 1 phần mềm nào đó.
Tuần tự làm theo các bước sau để khắc phục:
Lưu ý: Nên backup registry trước khi thực hiện!
1. Mở Registry Editor: Start > Run > gõ "regedit"
2. HKEY_LOCAL_MACHINE\SYSTEM\CurrentControlSet\Control\Class\{4D36E965-E325-11CE-BFC1-08002BE10318}
Nhìn sang bên phải và để ý thấy có 2 giá trị UpperFilters và LowerFilters
3. Xóa 2 giá trị UpperFilters và LowerFilters.
4. Restart lại máy khi đó máy sẽ nhận lại driver cho ổ CD/DVD.
Kết thúc!
Chủ Nhật, 15 tháng 2, 2009
How to Delete Undeletable Files in Windows
Many times when trying to remove an unwanted program, especially a piece of adware or spyware, you may run across a file that is undeletable by any normal method. When you try to remove it you'll receive the error message shown below telling you "access denied" and explaining the file may be in use. You may also receive one of the following messages.
Cannot delete file: Access is denied
There has been a sharing violation.
The source or destination file may be in use.
The file is in use by another program or user.
Make sure the disk is not full or write-protected and that the file is not currently in use.
So if the file is in use, how do you delete it?
I'll show you several ways of removing these types of files and even some freeware programs that help you remove these pesky undeletable files.
Manual Method
If you already know the path to the file, please skip to Step 7
Remove on Reboot Shell Extension
Using one of the three tools shown above, you should be able to remove those annoying undeleteable files once and for all.
Cannot delete file: Access is denied
There has been a sharing violation.
The source or destination file may be in use.
The file is in use by another program or user.
Make sure the disk is not full or write-protected and that the file is not currently in use.
So if the file is in use, how do you delete it?
I'll show you several ways of removing these types of files and even some freeware programs that help you remove these pesky undeletable files.

Windows 95/98/ME
If you are using Windows 95, 98, or Windows ME, the easiest way to remove an undeleteable file is to boot to a DOS prompt and manually delete the file. Before you do this, you'll want to make a note of the location of the file including the entire path to it. Follow the steps below to delete these types of files.
If you already know the path to the file, please skip to Step 7- Click on Start, Find, Files and Folders
- Type the name of the undeletable file in the Named or Search For box
- Make sure the Look In box shows the correct drive letter
- Click on Find Now or Search Now and let the computer find the file
- Once the file is located, right-click on it and choose properties, make a note of the file location. Usually this is something similar to
c:\windows\system32\undeleteablefilesname.exe
- Close the search box
- Locate a boot disk for your version of Windows, if you do not have a boot disk, follow the steps on the link below to create an emergency boot disk.
How to Create an Emergency Boot Disk for Windows
- Shut down and restart your computer with the boot disk in your floppy drive.
- The computer will boot to a DOS prompt that will look similar to
c:\
- Type the following command and press Enter to delete the filer, substituting the phrase
with the actual path and file name you discovered in Step 5 above.
del
Example:
del c:\windows\undeleteablefile.exe
- Remove the boot disk in the floppy drive and restart your computer
- The file should now be deleted.
Windows XP
In Windows XP, there are a couple ways to remove an undeleteable file, a manual way, and a couple automated ways using some freeware programs. First, I'll show you the manual way.Manual Method
If you already know the path to the file, please skip to Step 7
- Click on Start, Search, All Files and Folders
- Type the name of the undeletable file in the box shown
- Make sure the Look In box shows the correct drive letter
- Click Search and let the computer find the file
- Once the file is located, right-click on it and choose properties, make a note of the file location. Usually this is something similar to
c:\windows\system32\undeleteablefilesname.exe
- Close the search box
- Click on Start, Run, and type CMD and Press Enter to open a Command Prompt window
- Leave the Command Prompt window open, but proceed to close all other open programs
- Click on Start, Run and type TASKMGR.EXE and press Enter to start Task Manager
- Click on the Processes tab, click on the process named Explorer.exe and click on End Process.
- Minimize Task Manager but leave it open
- Go back to the Command Prompt window and change to the directory where the file is located. To do this, use the CD command. You can follow the example below.
Example: to change to the Windows\System32 directory you would enter the following command and Press Enter
cd \windows\system32
- Now use the DEL command to delete the offending file. Type DEL
where is the file you wish to delete.
Example: del undeletable.exe
- Use ALT-TAB to go back to Task Manager
- In Task Manager, click File, New Task and enter EXPLORER.EXE to restart the Windows shell.
- Close Task Manager
Remove on Reboot Shell Extension
This is a nice extension that loads into the right click menu. All you have to do is right-click on a file and choose "Remove on Next Reboot" and the file will be deleted the next time the computer restarts. Although it probably should only be used by more advanced computer users since it may be TOO easy to delete files using this program.
Pocket KillboxA simple .exe file that you can use to delete undeleteable files, although the program will also delete temporary files, edit the HOSTS file, and more. A definite must have program when you are fighting an annoying spyware or adware program that won't remove.
UnlockerUnlocker is another program that runs from the right click menu. Its simple and very effective. The website even has a side by side comparision of other programs that accomplish this task.
How to Start Windows in Safe Mode
Many times in order to remove a piece of spyware or for troubleshooting and diagnostic purposes, you'll have to start Windows in Safe Mode. While in Safe Mode, only specific programs and files needed to run the operating system are loaded. Some functions, such as connecting to the Internet, will not be active in Safe Mode and a standard video driver will be loaded causing a washed out look and a possible change in resolution.
However, because just the essential programs and files are loaded in Safe Mode, this allows us to remove some spyware, adware, viruses and such that cannot be removed in Normal Mode. Follow the instructions below to Start Safe Mode for your specific version of Windows. If you are trying to delete a file that is not allowing you to delete it (even in Safe Mode), you may want to read my article on How to Delete an Undeletable File.
Included at the bottom of the article are instructions for starting Windows Vista in Safe Mode too.
Windows Vista is similar to Windows XP for starting in Safe Mode.
However, because just the essential programs and files are loaded in Safe Mode, this allows us to remove some spyware, adware, viruses and such that cannot be removed in Normal Mode. Follow the instructions below to Start Safe Mode for your specific version of Windows. If you are trying to delete a file that is not allowing you to delete it (even in Safe Mode), you may want to read my article on How to Delete an Undeletable File.
Included at the bottom of the article are instructions for starting Windows Vista in Safe Mode too.
Windows 95
- Restart the computer.
- Just after the POST diagnostics and memory count, start pressing the F8 key
- On the Startup Menu, choose Safe Mode
Windows 98/Me
- Restart the computer.
- Just after the POST diagnostics and memory count, start pressing the F8 key
- On the Startup Menu, choose Safe Mode
or you may use the System Configuration Utility Method.
- While in Normal mode, Close all programs.
- Click Start, Run and type MSCONFIG in the box and click OK
- In the System Configuration Utility, on the General Tab, click the Advanced Button
- In the Advanced Troubleshooting Settings dialog box, check Enable Startup Menu. Click OK. Click OK again when the System Configuration Utility reappears.
- You will be prompted to restart the computer. Click Yes. The computer will restart in Safe mode.
- When you are finished with troubleshooting in Safe mode, open MSCONFIG again and uncheck "Enable Start-up Menu." under the Advanced Menu, then click OK and restart your computer
Windows 2000
- If the computer is running, shut down Windows, and then turn off the power
- Wait 30 seconds, and then turn the computer on.
- When you see the black-and-white Starting Windows bar at the bottom of the screen, start tapping the F8 key. The Windows 2000 Advanced Options Menu appears.
- Ensure that the Safe mode option is selected. In most cases, it is the first item in the list and is selected by default.
- Press Enter. The computer then begins to start in Safe mode.
- When you are finished with all troubleshooting, close all programs and restart the computer as you normally would.
Windows XP
If Windows XP is the only operating system installed on your computer, booting into Safe Mode with these instructions.
- If the computer is running, shut down Windows, and then turn off the power
- Wait 30 seconds, and then turn the computer on.
- Start tapping the F8 key. The Windows Advanced Options Menu appears. If you begin tapping the F8 key too soon, some computers display a "keyboard error" message. To resolve this, restart the computer and try again.
- Ensure that the Safe mode option is selected.
- Press Enter. The computer then begins to start in Safe mode.
- When you are finished with all troubleshooting, close all programs and restart the computer as you normally would.
To use the System Configuration Utility method
- Close all open programs.
- Click Start, Run and type MSCONFIG in the box and click OK
- The System Configuration Utility appears, On the BOOT.INI tab, Check the "/SAFEBOOT" option, and then click OK and Restart your computer when prompted.
- The computer restarts in Safe mode.
- Perform the troubleshooting steps for which you are using Safe Mode.
When you are finished with troubleshooting in Safe mode, open MSCONFIG again, on the BOOT.INI tab, uncheck "/SAFEBOOT" and click OK to restart your computer
Windows as part of a multiboot system
Use this method ONLY if you have multiple operating systems installed on your computer.
- If the computer is running, shut down Windows, and then turn off the power
- Wait 30 seconds, and then turn the computer on.
- When the Boot loader menu (list of the available operating systems) appears, use the arrow keys on the keyboard to select the version Windows what you want
- Press Enter, and then immediately begin tapping the F8 key. The Windows Advanced Options menu appears.
- Scroll to and select the Safe mode menu item, and then press Enter.
Windows Vista is similar to Windows XP for starting in Safe Mode.
- Turn the computer on or Restart the computer
- Start tapping the F8 key. The Windows Advanced Boot Options Menu appears. If you begin tapping the F8 key too soon, some computers display a "keyboard error" message. To resolve this, restart the computer and try again.
- Ensure that the Safe mode option is selected (the top option)
- Press Enter. The computer then begins to start in Safe mode.
- When you are finished with troubleshooting, close all programs and restart the computer as you normally would.
Windows cannot find 'resycled\ntldr.com'...

Symptoms - Triệu chứng:
When you double click on any shortcut for drive or directory, you cannot open them. It says that "Windows cannot find 'resycled\ntldr.com'. Make sure you typed the name correctly, and then try again. To search for a file, click the Start button, and then click Search."
Solve - Khắc phục:
How to remove ntldr.com?
First, enter the Windows using safe mode.
Kill process in the task manager:
ntldr.com
Delete Files and Folders:
C:\resycled\ntldr.com
C:\autorun.inf
%Programs%\aquaplay\Uninstall.lnk
%ProgramFiles%\aquaplay\Uninstall.exe
%Windir%\Temp\tmp6.tmp
Note: Open your drive using your mouse. Right click your drive and choose open. Then find the files.

Remove Registry Values(Click here for how to open Registry Editor):
ntldr.com,Note: Press 'Ctrl+F' and search all the files.
HKEY_CURRENT_USER\SOFTWARE\Trymedia Systems,
HKEY_CLASSES_ROOT\videoplay
HKEY_LOCAL_MACHINE\SOFTWARE\Classes\aquaplay
HKEY_CURRENT_USER\Software\aquaplay
Or just download this tools, click here. To use this tools, please enter the Windows using safe mode also.
Warning: If you delete the wrong files, it will make your computer unstable and can not be open. Your Windows also can be open and showing error such as 'Ntldr is missing'.
Đăng ký:
Bài đăng (Atom)