Đôi khi lướt Web thì bất chợt right-click chuột định copy link hay save 1 tấm hình ... thì thấy hắn bị khóa mất :( Đừng lo vì đã có hướng giải quyết cho bạn.
Nếu bạn đang dùng Internet Explorer 6 và 7
1. Click “Tools”->”Internet Options”
2. Click the “Security” tab.
3. Click “Custom Level”
4. Rê chuột xuống tới “scripting”.
5. Điều chỉnh “Active Scripting” thành “disable” (Active scripts là những chương trình được viết bằng Javascript)
6. Click “Ok”. Restart lại trình duyệt.
Note: Khi đó sẽ disable Javascript trả lại từ trình duyệt, có nghĩa là cái script tắt right-click của website sẽ không hoạt động nữa.
Đối với Mozilla Firefox, các bước này sẽ cho kết quả giống nhau (có thể khác tùy thuộc vào version).
1. “Tools” -> “Options”
2. Click “Web Features”
3. Bỏ chọn enable JavaScript
Làm ngược lại để enable JavaScript trở lại.
Hoặc đơn giản hơn là copy dòng code dưới đây và cho nó chạy trên thanh address của trình duyệt:
javascript:void(document.oncontextmenu=null
Thứ Năm, 5 tháng 3, 2009
Thứ Tư, 4 tháng 3, 2009
Hướng dẫn sử dụng trình duyệt Firefox
Hiện nay có rất nhiều trình duyệt web, như là: Internet Explorer, Mozilla, Firefox, Netscape, Opera,.... Mỗi trình duyệt có giao diện và tính năng khác nhau. Để chọn cho mình một trình duyệt phù hợp cũng không khó nhưng cũng không dễ vì đa số người dùng chưa được trang bị đầy đủ kiến thức cần thiết. Mình là một fan của Firefox nên bài viết này sẽ chỉ nói về Firefox.
Các add-on thường dùng:
Các add-on là phần mở rộng cho trình duyệt. Mỗi add-on có một chức năng nào đó mà bạn muốn thêm vào cho Firefox. Bạn có thể Disable/Enable các add-on trong quá trình sử dụng.
Flashblock - add-on 433: https://addons.mozilla.org/en-US/firefox/addon/433
Flashblock là một mở rộng dành cho các trình duyệt Mozilla, Firefox, và Netscape.
Chức năng: Chặn tất cả nội dung Macromedia Flash có trên trang web. Sau đó chừa ra những chổ trên trang web cho phép người dùng click để tải về và sau đó xem nội dung Flash.
Flashblock chặn các loại nội dung sau:
* Macromedia Flash
* Macromedia Shockwave
* Macromedia Authorware
Flashblock - add-on 433: https://addons.mozilla.org/en-US/firefox/addon/433
Flashblock là một mở rộng dành cho các trình duyệt Mozilla, Firefox, và Netscape.
Ch
Thứ Ba, 3 tháng 3, 2009
Hacking Rapidshare Tutorials
Hacking Rapidshare Complete Hacking Process || 1.08 MB
The Complete Rapidshare hacking Process Step by Step If u Like these post Plz Give 5 stars or more
Download:
http://rapidshare.com/files/203208017/Hacking.Rapidshare.Complete.Hacking.Process.rar
Mirror:
http://www.easy-share.com/1903817462/Hacking.Rapidshare.Complete.Hacking.Process.rar
The Complete Rapidshare hacking Process Step by Step If u Like these post Plz Give 5 stars or more
Download:
http://rapidshare.com/files/203208017/Hacking.Rapidshare.Complete.Hacking.Process.rar
Mirror:
http://www.easy-share.com/1903817462/Hacking.Rapidshare.Complete.Hacking.Process.rar
Thứ Hai, 2 tháng 3, 2009
In use
http://www.megaupload.com/?d=A0L5YD9S http://ifile.it/1giflq0
http://www.megaupload.com/?d=X44899JE http://ifile.it/pq7zve2 http://www.mediafire.com/?jkjlmfoexmn
http://www.megaupload.com/?d=QSJGG2NA http://ifile.it/fpbqtd2 http://www.mediafire.com/?zb0ubm5vxvd
http://www.megaupload.com/?d=27G1VH9B http://ifile.it/qb0hrel http://www.mediafire.com/?0jbb2ng5boy
http://www.megaupload.com/?d=H0ZFVA3N http://ifile.it/spexa4k http://www.mediafire.com/?hmvhe4e1zvr
http://www.megaupload.com/?d=Y2YDAR2R http://ifile.it/d3urbmh http://www.mediafire.com/?yzzm0sxdzbl
http://www.megaupload.com/?d=QV3O05QX http://ifile.it/1bj0h8x http://www.mediafire.com/?gtmwnztipzs
http://www.megaupload.com/?d=R4F2EIJ7 http://ifile.it/ibelqvn http://www.mediafire.com/?6vlim2yz6bi
http://www.megaupload.com/?d=5LMZSDIT
http://www.megaupload.com/?d=L7V6KNV7
http://www.megaupload.com/?d=JJEEJCEB
http://www.megaupload.com/?d=JISRF02P
http://www.megaupload.com/?d=U6AF7HQF
http://www.megaupload.com/?d=UTF3E52N
http://www.megaupload.com/?d=I7PDW20L
http://www.megaupload.com/?d=447EJON7
http://www.megaupload.com/?d=3X4DQEQR
http://www.megaupload.com/?d=FPBONKC7
http://www.megaupload.com/?d=CDOTBQS5
http://www.megaupload.com/?d=50C6T27G
http://www.megaupload.com/?d=SJMD7UTQ
http://www.updatesofts.com/forums/showthread.php?t=149296
http://avaxhome.ws/software/software_type/others/pm1_50.html
http://fdnlinks.com/ http://www.link-protector.com/indexs-x.php http://protectlinks.com/index.php
http://link-protector.com/x-26047 http://www.protectlinks.com/186215
http://rapidshare.com/files/204396795/50.skills.pm.part01.rar
^-^****** My Acc RS
01.OngTrumMafia.rar, size 5.1 MB...
http://www.mediafire.com/?yxew09i6h1b
http://rapidshare.com/files/203236224/01.OngTrumMafia.rar
http://rapidshare.com/files/203237109/02.OngTrumMafia.rar
http://rapidshare.com/files/203237325/03.OngTrumMafia.rar
http://rapidshare.com/files/203237488/04.OngTrumMafia.rar
http://rapidshare.com/files/203237671/05.OngTrumMafia.rar
http://rapidshare.com/files/203237827/06.OngTrumMafia.rar
http://rapidshare.com/files/203238004/07.OngTrumMafia.rar
http://rapidshare.com/files/203238220/08.OngTrumMafia.rar
http://rapidshare.com/files/203238421/09.OngTrumMafia.rar
http://rapidshare.com/files/203238729/10.OngTrumMafia.rar
http://belesrapidsharepremium.blogspot.com
542539:FrKqaaSJ
tinazonater:zombie
countryghost:sabina6242
Glenn Gould
The Complete Original Jacket Collection 80CD
SONY CLASSICS 2007
eac-log-cue-ape-rar
rip by Peterpiano
NEW RS LINKS:
http://rapidshare.com/files/193203873/glenn01.rar
http://rapidshare.com/files/193253717/glenn02.rar
http://rapidshare.com/files/193253997/glenn03.rar
http://rapidshare.com/files/193253995/glenn04.rar
http://rapidshare.com/files/193254256/glenn05.rar
http://rapidshare.com/files/193346933/glenn06.rar
http://rapidshare.com/files/193347293/glenn07.rar
http://rapidshare.com/files/193353419/glenn08.rar
http://rapidshare.com/files/193355911/glenn09.rar
http://rapidshare.com/files/193363180/glenn10.rar
http://rapidshare.com/files/193362217/glenn11.rar
http://rapidshare.com/files/193373355/glenn12.rar
http://rapidshare.com/files/191528253/glenn13.part1.rar
http://rapidshare.com/files/191536201/glenn13.part2.rar
http://rapidshare.com/files/191548468/glenn14.part1.rar
http://rapidshare.com/files/191563371/glenn14.part2.rar
http://rapidshare.com/files/191572296/glenn14.part3.rar
http://rapidshare.com/files/191585101/glenn15.part1.rar
http://rapidshare.com/files/191601618/glenn15.part2.rar
http://rapidshare.com/files/191613718/glenn15.part3.rar
http://rapidshare.com/files/191629108/glenn16.part1.rar
http://rapidshare.com/files/191649940/glenn16.part2.rar
http://rapidshare.com/files/190999511/17.GG.part1.rar
http://rapidshare.com/files/191008653/17.GG.part2.rar
http://rapidshare.com/files/191009357/17.GG.part3.rar
http://rapidshare.com/files/191665225/glenn18.part1.rar
http://rapidshare.com/files/191675106/glenn18.part2.rar
http://rapidshare.com/files/191689731/glenn19.part1.rar
http://rapidshare.com/files/191706537/glenn19.part2.rar
http://rapidshare.com/files/191708207/glenn19.part3.rar
http://rapidshare.com/files/191722058/glenn20.part1.rar
http://rapidshare.com/files/191731472/glenn20.part2.rar
http://rapidshare.com/files/191262086/21.GGnew.rar
http://rapidshare.com/files/191294844/22-1.GGnew.part1.rar
http://rapidshare.com/files/191301945/22-1.GGnew.part2.rar
http://rapidshare.com/files/191303239/22-2.GGnew.part1.rar
http://rapidshare.com/files/191286137/22-2.GGnew.part2.rar
http://rapidshare.com/files/191262088/23.GGnew.rar
http://rapidshare.com/files/191262090/24-1.GGnew.rar
http://rapidshare.com/files/191262092/24-2.GGnew.rar
http://rapidshare.com/files/191281116/25.GGnew.rar
http://rapidshare.com/files/191283445/26.GGnew.rar
http://rapidshare.com/files/191285585/27.GGnew.rar
http://rapidshare.com/files/191285771/28.GGnew.rar
http://rapidshare.com/files/191261872/29.GGnew.rar
http://rapidshare.com/files/191307126/30.GGnew.rar
http://rapidshare.com/files/191311042/31.GGnew.part1.rar
http://rapidshare.com/files/191312721/31.GGnew.part2.rar
http://rapidshare.com/files/191320231/32.GGnew.rar
http://rapidshare.com/files/191321858/33.GGnew.rar
http://rapidshare.com/files/191323275/34.GGnew.rar
http://rapidshare.com/files/191325997/35.GGnew.part1.rar
http://rapidshare.com/files/191327904/35.GGnew.part2.rar
http://rapidshare.com/files/191335887/36.GGnew.rar
http://rapidshare.com/files/191339412/37.GGnew.part1.rar
http://rapidshare.com/files/191339409/37.GGnew.part2.rar
http://rapidshare.com/files/191339593/38.GGnew.rar
http://rapidshare.com/files/191306856/39.GGnew.rar
http://rapidshare.com/files/191346890/40.GGnew.rar
http://rapidshare.com/files/191350727/41.GGnew.rar
http://rapidshare.com/files/191353627/42.GGnew.part1.rar
http://rapidshare.com/files/191354313/42.GGnew.part2.rar
http://rapidshare.com/files/191354565/43.GGnew.part1.rar
http://rapidshare.com/files/191363770/43.GGnew.part2.rar
http://rapidshare.com/files/191364237/44.GGnew.rar
http://rapidshare.com/files/191366048/45.GGnew.rar
http://rapidshare.com/files/191366617/46.GGnew.rar
http://rapidshare.com/files/191367593/47.GGnew.part1.rar
http://rapidshare.com/files/191372786/47.GGnew.part2.rar
http://rapidshare.com/files/191377215/48.GGnew.rar
http://rapidshare.com/files/191377846/49.GGnew.part1.rar
http://rapidshare.com/files/191379896/49.GGnew.part2.rar
http://rapidshare.com/files/191380607/50.GGnew.rar
http://rapidshare.com/files/191381277/51.GGnew.rar
http://rapidshare.com/files/191385847/52.GGnew.rar
http://rapidshare.com/files/191389500/53.GGnew.rar
http://rapidshare.com/files/191389845/54-1.GGnew.rar
http://rapidshare.com/files/191393429/54-2.GGnew.rar
http://rapidshare.com/files/191394562/55-1.GGnew.part1.rar
http://rapidshare.com/files/191397613/55-1.GGnew.part2.rar
http://rapidshare.com/files/191398121/55-2.GGnew.rar
http://rapidshare.com/files/191401989/56-1.GGnew.part1.rar
http://rapidshare.com/files/191403597/56-1.GGnew.part2.rar
http://rapidshare.com/files/191403948/56-2.GGnew.part1.rar
http://rapidshare.com/files/191405335/56-2.GGnew.part2.rar
http://rapidshare.com/files/191543784/57.GGnew.rar
http://rapidshare.com/files/191409803/58-1.GGnew.rar
http://rapidshare.com/files/191411712/58-2.GGnew.rar
http://rapidshare.com/files/191341116/59.GGnew.rar
http://rapidshare.com/files/191413440/60.GGnew.rar
http://rapidshare.com/files/191415214/61.GGnew.rar
http://rapidshare.com/files/191418371/62-1.GGnew.rar
http://rapidshare.com/files/191420585/62-2.GGnew.rar
http://rapidshare.com/files/191422340/63-1.GGnew.rar
http://rapidshare.com/files/191424580/63-2.GGnew.part1.rar
http://rapidshare.com/files/191428213/63-2.GGnew.part2.rar
http://rapidshare.com/files/191429253/64-1.GGnew.rar
http://rapidshare.com/files/191431923/64-2.GGnew.rar
http://rapidshare.com/files/191433580/65.GGnew.part1.rar
http://rapidshare.com/files/191433753/65.GGnew.part2.rar
http://rapidshare.com/files/191437952/66.GGnew.rar
http://rapidshare.com/files/191439619/67.GGnew.rar
http://rapidshare.com/files/191440838/68.GGnew.rar
http://rapidshare.com/files/191443899/69.GGnew.part1.rar
http://rapidshare.com/files/191446011/69.GGnew.part2.rar
http://rapidshare.com/files/191450047/70.GGnew.part1.rar
http://rapidshare.com/files/191411753/70.GGnew.part2.rar
55 links found in http://rapidshare.com/users/******
http://rapidshare.com/files/131754861/Introducing_The_Beatles_v2_US_Mono.rar
http://rapidshare.com/files/131754274/Introducing_The_Beatles_v2_US_Stereo.rar
http://rapidshare.com/files/131753836/Last_Licks_Live_US_Mono.rar
http://rapidshare.com/files/131753361/Let_It_Be_MFSL.rar
http://rapidshare.com/files/131753030/Magical_Mystery_Tour_MFSL.part1.rar
http://rapidshare.com/files/131752476/Magical_Mystery_Tour_MFSL.part2.rar
http://rapidshare.com/files/131752162/Magical_Mystery_Tour_US_Mono.rar
http://rapidshare.com/files/131751551/Meet_the_Beatles_US_Stereo.rar
http://rapidshare.com/files/131751159/Please_Please_Me_MFSL.rar
http://rapidshare.com/files/131750701/Please_Please_Me_UK_Mono.rar
http://rapidshare.com/files/131750376/Rarities_US_Mono-Stereo.rar
http://rapidshare.com/files/131749817/Revolver_MFSL.rar
http://rapidshare.com/files/131749329/Revolver_UK_Mono.rar
http://rapidshare.com/files/131748863/Rock_n_Roll_Music_US_Stereo.part1.rar
http://rapidshare.com/files/131748175/Rock_n_Roll_Music_US_Stereo.part2.rar
http://rapidshare.com/files/131747845/Rubber_Soul_MFSL.rar
http://rapidshare.com/files/131747336/Rubber_Soul_UK_Mono.rar
http://rapidshare.com/files/131746940/Rubber_Soul_US_Mono.rar
http://rapidshare.com/files/131746246/Second_Album_US_Mono.rar
http://rapidshare.com/files/131745703/Sgt._Pepper_s_Lonely_Hearts_Club_Band_MFSL.part1.rar
http://rapidshare.com/files/131744913/Sgt._Pepper_s_Lonely_Hearts_Club_Band_MFSL.part2.rar
http://rapidshare.com/files/131744604/Sgt._Pepper_s_Lonely_Hearts_Club_Band_US_Mono.rar
http://rapidshare.com/files/131744112/The_Beatles_MFSL.part1.rar
http://rapidshare.com/files/131743553/The_Beatles_MFSL.part2.rar
http://rapidshare.com/files/131742787/The_Beatles_MFSL.part3.rar 27107 KB
http://www.mediafire.com/?vy0jxm1ni5i
http://rapidshare.com/files/131742480/The_Beatles_UK_Mono.part1.rar
http://rapidshare.com/files/131741893/The_Beatles_UK_Mono.part2.rar
http://rapidshare.com/files/131740939/The_Beatles_UK_Mono.part3.rar 17801 KB
http://www.mediafire.com/?lm20btfv1xb
http://rapidshare.com/files/131740468/With_The_Beatles_Canadian_Stereo.rar
http://rapidshare.com/files/131739787/With_The_Beatles_MFSL.rar
http://rapidshare.com/files/131739181/With_The_Beatles_UK_Mono.rar
http://rapidshare.com/files/131738625/Yellow_Submarine_MFSL.part1.rar
http://rapidshare.com/files/131737953/Yellow_Submarine_MFSL.part2.rar 1731 KB
http://www.mediafire.com/?bbur1gmsfcx
http://rapidshare.com/files/131736899/Yellow_Submarine_Songtrack_Mono.part1.rar
http://rapidshare.com/files/131736206/Yellow_Submarine_Songtrack_Mono.part2.rar 29548 KB
http://www.mediafire.com/?bbur1gmsfcx
http://rapidshare.com/files/131737490/Yellow_Submarine_UK_Mono.rar
http://rapidshare.com/files/131735829/Yesterday_and_Today_US_Mono.rar
http://rapidshare.com/files/131735359/Yesterday_and_Today_US_Stereo.rar
http://avaxhome.ws/video/eLearning/4r3s_28bc.html
http://www.updatesofts.com/forums/showthread.php?p=1243626#post1243626
1.5 GB
B00005Q5XG http://www.amazon.com/Individual-Software-Inc-PRF-WXP-Professor/dp/B00005Q5XG
part 01-05
http://www.mediafire.com/?11soyyfi0bg
part 06-10
http://www.mediafire.com/?ybbn3dydlnm
http://www.mediafire.com/?jhkpkd0veiz
http://www.mediafire.com/?et9smil0vod
http://www.mediafire.com/?wdan234s2fy
part 11-13
http://www.mediafire.com/?mzasjj2icyl
http://www.mediafire.com/?g0ndietlmvt
http://www.mediafire.com/?itcexdmjzbx
sfv
http://www.mediafire.com/?mgcnwhojwow
CD1
http://www.mediafire.com/?3dlygkd1dtg
http://www.mediafire.com/?1de9dfdkycm
http://www.mediafire.com/?3idmf9ddcn3
CD 2
http://www.mediafire.com/?exy1zdg9mgd
http://www.mediafire.com/?f5gmgcghwti
http://www.mediafire.com/?gqi2hdydyvz
CD 3
http://www.mediafire.com/?mcvmdw93d1t
http://www.mediafire.com/?2ilxggygguo
http://www.mediafire.com/?cjmm11ddw3k
CD 4
http://www.mediafire.com/?ta9jwcmlsem
http://www.mediafire.com/?mymjvyd1wzm
http://www.mediafire.com/?dhwgldltgc9
CD 5
http://www.mediafire.com/?bxbkmyddi2l
http://www.mediafire.com/?xbixmdimggl
CD 6
http://www.mediafire.com/?lml9xsiim9l
http://www.mediafire.com/?2gwptgyjngw
CD 7
http://www.mediafire.com/?dxdzal3wmfy
http://www.mediafire.com/?z1m3y2wer2z
http://www.mediafire.com/?zg3xtghc11u
CD 8
http://www.mediafire.com/?ihimjhlmm2y
http://www.mediafire.com/?eddd3cs1rmc
http://www.mediafire.com/?c2gywmtgmgt
CD 9
http://www.mediafire.com/?1w2gjfuycyd
http://www.mediafire.com/?lgnzqjchy2m
http://www.mediafire.com/?pmnjgrixbuc
CD 10
http://www.mediafire.com/?tctffnycwlz
http://www.mediafire.com/?gorv2c9bhcn
CD 11
http://www.mediafire.com/?2tm91diywxy
http://www.mediafire.com/?jgdumhd2tmr
http://www.mediafire.com/?wlwmcnmdjmy
CD 12
http://www.mediafire.com/?rzdc4cfwoh9
http://www.mediafire.com/?g3xy5xt9el9
http://www.mediafire.com/?wnvwfs3ldgc
CD 13
http://www.mediafire.com/?whncwdsdzcu
http://www.mediafire.com/?vzgcd9mxzl3
http://www.mediafire.com/?mdldwwt19yc
CD 14
http://www.mediafire.com/?heygjx9ldmy
http://www.mediafire.com/?jgry9vmmkdy
http://www.mediafire.com/?cd2ldlctzz1
CD 15
http://www.mediafire.com/?gwaav3dcbdg
http://www.mediafire.com/?nzezlmedy1y
CD 16
http://www.mediafire.com/?cmuhfcr1ceg
http://www.mediafire.com/?d3gcgchddcz
http://www.mediafire.com/?dz9d3dslccm
CD 17
http://www.mediafire.com/?rwiszn3krdt
http://www.mediafire.com/?gmycgtrjrmj
http://www.mediafire.com/?m9c9ldyscmr
CD 18
http://www.mediafire.com/?dbxw2th2h1l
http://www.mediafire.com/?w2lgectyxyt
http://www.mediafire.com/?mg1dfvu4y5c
CD 22
http://www.mediafire.com/?cz1dczd3s32
http://www.mediafire.com/?wsi1blbt2lz
http://www.mediafire.com/?nnuy2imeye1
CD 23
http://www.mediafire.com/?rgigf2gngde
http://www.mediafire.com/?rhrwygb2eig
http://www.mediafire.com/?w1vg5t91232
CD 24
http://www.mediafire.com/?ndndzjgjxdc
http://www.mediafire.com/?dz3zuswxjjc
http://www.mediafire.com/?wgzlueghhe3
CD 25
http://www.mediafire.com/?wdwmzwzwjlk
http://www.mediafire.com/?wijzsdddydn
http://www.mediafire.com/?lnidz9nt313
CD 26
http://www.mediafire.com/?pdowz3yt1wr
http://www.mediafire.com/?3z3gyszzd2d
http://www.mediafire.com/?fjtoqwtcmcn
CD 27
http://www.mediafire.com/?1jbyds2eyrg
http://www.mediafire.com/?xh5yf1rcccd
http://www.mediafire.com/?zwiuh31gguc
CD 28
http://www.mediafire.com/?hcwmdvzxqll
http://www.mediafire.com/?dczgywzzvlw
CD 29
http://www.mediafire.com/?wszzzmdmdz1
http://www.mediafire.com/?9lyw5ghsybw
http://www.mediafire.com/?cyi1w1hzov9
CD 30
http://www.mediafire.com/?botdggtg4i1
http://www.mediafire.com/?izujyybhoge
CD31-80
http://www.mediafire.com/?sharekey=28a559f33c09fcb57d02f3bc65fe30716ac30b0cd3cfd2d5
Chủ Nhật, 1 tháng 3, 2009
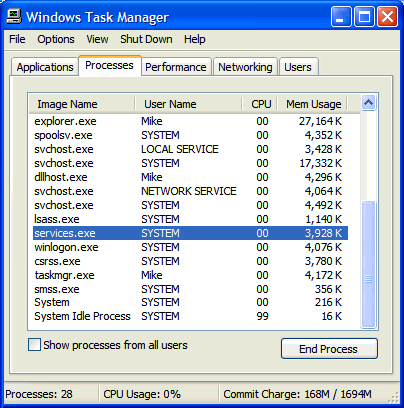
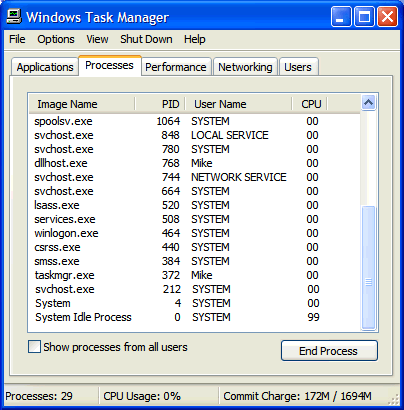
Windows Services - Cách dịch vụ trong Windows
Mở "Services Editor"để bật/tắt services:
DNS Client
Mô tả: Phân tích và cache tên Domain Name System (DNS) cho máy tính này. Nếu service này bị stopped, máy tính này sẽ không thể phân tích tên DNS và định vị Active Directory domain controllers. Nếu service này bị disabled, bất kỳ services nào phụ thuộc explicitly vào nó sẽ fail to start.
Fast User Switching Compatibility
Mô tả: Provides management for applications that require assistance in a multiple user environment.
- Start | Run (type) "services.msc" (no quotes)
- Scroll down to "DNS Client", Right-click and select: Properties
- Click the drop-down arrow for "Startup type"
- Select: Manual, or Disabled (recommended) click Apply/Ok and restart. [more info]
DNS Client
Mô tả: Phân tích và cache tên Domain Name System (DNS) cho máy tính này. Nếu service này bị stopped, máy tính này sẽ không thể phân tích tên DNS và định vị Active Directory domain controllers. Nếu service này bị disabled, bất kỳ services nào phụ thuộc explicitly vào nó sẽ fail to start.
Fast User Switching Compatibility
Mô tả: Provides management for applications that require assistance in a multiple user environment.
How To: Determine what Services are running in Windows XP
When you bring up the Task Manager you'll see an entry for Services and the amount of memory consumed. However this one listing is actually all the Services combined into a single entry. As you can see I have them trimmed down to only the Services needed for this machine. To view the complete list:
From a command prompt: Start | Run (type) cmd (click Ok)
(type) tasklist /svc (press Enter)(XP Pro only)
You will see all the Services running in process.
To save the onscreen info:
- Right-click and select: Select All
- Right-click again and select: Mark
- Open Notepad and Paste the info
- File - Save As: tasklist.txt
or- (type) "tasklist /svc >tasklist.txt" (no quotes)
To Remove any unneeded running Processes
Log on as Administrator
Start | Settings | Control Panel | Administrative Tools | ServicesOnce completed, repeat the "tasklist /svc" method and compare.
If you use the "tasklist /svc >tasklist.txt" method, change the second output (to prevent overwriting the previous file) to: "tasklist /svc >tasklist1.txt" (no quotes) then compare. You can also view this info in System Information, however the text output loses the formatting and is almost unreadable.Note: to temporarily disable a Service while troubleshooting:
Start | Run (type) "msconfig" (no quotes)
Click on the Services tab, uncheck desired service. (for testing only!)
To display the Process Identifier in Task Manager
Right-click on the Taskbar, select: Task Manager
Click on the Processes tab, click View (up top)
Select: "Select Columns", and select: PID
(Process Identifier) from there you can also select any of the other options available.You can also sort the entries by clicking on the header in each section.
Note: Each time you remove or add a Service the PID for the Services.exe entry will change.
Protecting your Security and Privacy
On a stand-alone system you should disable or at least Stop and set to "Manual" the Remote Access services, unless you really have a need for these. This would include [example] TCP/IP NetBIOS Helper, Telnet, Routing and Remote Access, Remote Access Auto Connection Manager, QoS RSVP, Remote Registry, etc. The point to all this is that the amount of unneeded services running directly affects the amount of Ports open and exposes the user to unnecessary risks. This tends to leave your Firewall full of holes!
Even XP's Firewall (ICF) can achieve "Stealth" results [more info] After a while you'll notice all these things are tied together. If you're getting "Message Service" pop-ups it's usually because one or more of your Ports are open. [more info - on pop-ups] A great place to start is by testing your setup by running ShieldsUP [Internet port vulnerabilities]
Symantec Security Response encourages all users and administrators to adhere to the following basic security "best practices":
Turn off and remove unneeded services. By default, many operating systems install auxiliary services that are not critical, such as an FTP server, telnet, and a Web server. These services are avenues of attack. If they are removed, blended threats have less avenues of attack and you have fewer services to maintain through patch updates. The SANS Top 20 Internet Security Vulnerabilities
"These non essential services increase the exploit surface significantly."Microsoft TechNet - Threats and Countermeasures: Security Settings in Windows (XP)
"Therefore, you should disable or remove any unneeded services"
To avoid the above manual method
Sysinternals Freeware - Autoruns - this terrific utility can display and disable (if needed) [screenshot]
Safe XP allows users to quickly tweak various security and privacy related settings in XP.
This is a very useful little freeware utility! Compare the recommended Safe XP settings to the one's on Black Viper's site, then decide for yourself what is needed. [Screenshot]
How To: Generate a Printout of running Services
Run HijackThis | Config [button]
Select: "Include list of running processes in logfiles"
Click the "Misc Tools" [button]
Select: "List also minor sections", Select: "List empty sections"
Click "Generate Startuplist log" [button]
Open "Startuplist.txt" and scroll down to: "Enumerating Windows NT\2K\XP Services"
Use Netstat to Determine what Services are "Listening"
From a Command Prompt (type) "netstat -ano" (no quotes) To create a text file of this info - (type) "netstat -ano >autocon.txt" You can also use Sysinternals Freeware - TCPView to view a detailed listings
of all TCP and UDP endpoints on your system
Related Articles
C:\WINDOWS\system32\drivers\etc\hosts file in Windows XP
What is the C:\WINDOWS\system32\drivers\etc\hosts file for on XP?
Sưu tầm: http://answers.yahoo.com/question/index?qid=20080309160143AAwJUpT
http://en.wikipedia.org/wiki/Hosts_file
http://www.mvps.org/winhelp2002/hosts.htm
It's your Hosts file. Think of it as a Rolodex for your computer. Its where a computer looks first to translate the URL of a website into a numerical IP address that it can actually use.
Lấy ví dụ yahoo.com là http://66.94.234.13
Dùng Hosts file có thể tăng tốc một chút, nhưng hiện nay gần như không còn được dùng như mục đích ban đầu của nó.
Hiện nay, Hosts file được dùng chủ yếu để khóa truy nhập các websites không mong muốn. Chẳng hạn như ad-servers và các trang được biết là có malicious code (viruses...). Bằng cách ấn định một địa chỉ IP address của 127.0.0.1 cho bất kỳ trang nào không mong muốn. 127.0.0.1 being ones own computer (localhost) which effectively blocks access to the site!
There are several readily availible Hosts file block lists that are used to totally block access to bad, suspect and annoying sites.
MVPS has an excellent HOSTS file block list,
"Bạn có thể tùy chỉnh HOSTS file để chặn ads-quảng cáo, banners, 3rd party Cookies, 3rd party page counters, web bugs, and even most hijackers. This is accomplished by blocking the connection(s) that supplies these little gems." About 30000 sites, ad-servers etc are blocked!
free at: http://www.mvps.org/winhelp2002/hosts.htm
The use of a custom Hosts file is a nice extra layer of security. After all, a website can't infect you if you can not access it now, can it?
 |
What it does ...
The Hosts file chứa the mappings của địa chỉ IP tới tên của host. File này được load vào bộ nhớ - memory (cache) ở startup, sau đó Windows kiểm tra the Hosts file trước khi nó truy vấn bất kỳ DNS servers nào, which enables it to override addresses in the DNS. This prevents access to the listed sites by redirecting any connection attempts back to the local (your) machine. Another feature of the HOSTS file is its ability to block other applications from connecting to the Internet, providing the entry exists.You can use a HOSTS file to block ads, banners, 3rd party Cookies, 3rd party page counters, web bugs, and even most hijackers. This is accomplished by blocking the connection(s) that supplies these little gems.
Example - the following entry 127.0.0.1 ad.doubleclick.net blocks all files supplied by that DoubleClick Server to the web page you are viewing. This also prevents the server from tracking your movements. Why? ... because in certain cases "Ad Servers" like Doubleclick (and many others) will try to open a separate connection on the webpage you are viewing.
For XP SP2 users you should see a Security Center prompt about allowing this connection. [screenshot]
Simply click No and continue. Yes the prompts can be annoying but at least you'll know, however you should not see these prompts if these entries are included in the HOSTS file.
Note: this prompt only occurs if (example) *.doubleclick.net is included in the "Restricted Zone".
More Examples
AdTech | BridgeTrack | Honesty | Mgnetwork | ValueClick | Google AdSense | Atdmt | Atdmt
Now here is a 3rd party ad server opening a connection to another 3rd party ad server - Ad-Flow
More 3rd parties opening other 3rd parties: Overture | Overture | Directtrack | Directtrack | RealMedia
Note: By placing these type sites in the Restricted Zone this also cures most "Back Button" issues.
Now includes most major parasites, hijackers and unwanted Adware/Spyware programs!
Proudly now the #1 rated HOSTS file on the Internet! - Google | MSN | Yahoo | AltaVista
Now regularly featured on the Kim Komando Radio Show
The MVPS HOSTS file has been selected by Pricelessware as "the best of the best in Freeware" for the 2nd time ...In many cases using a well designed HOSTS file can speed the loading of web pages by not having to wait for these ads, annoying banners, hit counters, etc. to load. This also helps to protect your Privacy and Security by blocking sites that may track your viewing habits, also known as "click-thru tracking" or Data Miners. Simply using a HOSTS file is not a cure-all against all the dangers on the Internet, but it does provide another very effective "Layer of Protection".
Editors Note: As time has progressed the focus of this project has changed from just blocking ads/banners to protecting the user from the many parasites that now exist on the Internet. It doesn't serve much purpose if you block the ad banner from displaying as most other HOSTS files do, but get hijacked by a parasite from an evil exploit or download contained on the web site. The object is to surf faster while preserving your Safety, Security and Privacy. [more info]
To view the HOSTS file in plain text form. (597 kb) (opens in browser)
Note: The text version also makes a terrific reference for determining possible unwanted sites
Download: hosts.zip [right-click - Select: Save Target As] [Updated February-11-2009]This download includes a simple batch file (mvps.bat) that will rename the existing HOSTS file to HOSTS.MVP then copy the included updated HOSTS file to the proper location. For more information please see the readme.txt included in the download.
Important! Windows Vista requires special instructions
" width="22" align="baseline" border="0" height="17"> see here
When you run the (mvps.bat) batch file XP users may see a prompt, simply click Run and continue. Once updated you should see another prompt that the task was completed. Some users may see a pop-up from certain Security programs about changes to the HOSTS file. Allow the change ... however if you see this pop-up at any other time ... investigate.
Download Information: (checksum info is on the HOSTS file not the "hosts.zip")
MD5: 07ddea0cb7d2c5083775cf122ebb20c4 SHA-1: 8c504a97dd3ae52282d3ba4c3a8a8596a352d257
(created by File Checksum Integrity Verifier) To view Checksum for this download
Manual Method - Unzip in a "temp" folder and place in the appropriate installed location:
- If you are having trouble downloading or extracting the HOSTS file
Note: the below locations are for the typical default paths, edit as needed.
Windows Vista = C:\WINDOWS\SYSTEM32\DRIVERS\ETC Windows XP = C:\WINDOWS\SYSTEM32\DRIVERS\ETC Windows 2K = C:\WINNT\SYSTEM32\DRIVERS\ETC Win 98/ME = C:\WINDOWS There is no need to turn on, adjust or change any settings with the exception of the DNS Client service (see below). Windows automatically looks for the existence of a HOSTS file and if found, checks the HOSTS file first for entries to the web page you just requested. The 127.0.0.1 is the location of your computer, so when the entry (example) "ad.doubleclick.net" is requested your computer thinks 127.0.0.1 is the location of the file. When this file is not located it skips onto the next file and thus the ad server is blocked from loading the banner, Cookie, or some unscrupulous ActiveX, or javascript file.
In case you're wondering ... this all happens in microseconds, which is much faster than trying to fetch a file from half way around the world. Another great feature of the HOSTS file is that it is a two-way file, meaning if some parasite does get into your system (usually bundled with other products) the culprit can not get out (call home) as long as the necessary entries exist. This is why it's important to keep your HOSTS file up to Date. Subscribe to a secure mailing list
Editors Note: in most cases a large HOSTS file (over 135 kb) tends to slow down the machine. This only occurs in W2000/XP/Vista. Windows 98 and ME are not affected.
To resolve this issue (manually) open the "Services Editor"
- Start | Run (type) "services.msc" (no quotes)
- Scroll down to "DNS Client", Right-click and select: Properties
- Click the drop-down arrow for "Startup type"
- Select: Manual, or Disabled (recommended) click Apply/Ok and restart. [more info]
When set to Manual (or Disabled) you can see that the above "Service" is not needed (after a little browsing - when set to Manual) by opening the Services Editor again, scroll down to DNS Client and check the "Status" column. It should be blank, if it was needed it would show "Started" in that column. There are several Utilities that can reset the DNS Client for you ... [more info]
Editors Note: The above instructions are intended for a single (home-user) PC. If your machine is part of a "Domain", check with your IT Dept. before applying this work-around. This especially applies to Laptop users who travel or bring their work machines home. Make sure to reset the Service (if needed) prior to connecting (reboot required) to your work Domain ...
JBF sends along this Tip: IPCOP running a DHCP server needs the local PC DNS Client enabled to function.
Reset the DNS Client with a simple batch file (submitted by: Ronny Ong - 2K/XP only)
DnsManual.bat (resets the DNS Client to Manual) [right-click and select: Save Target As]
DnsDisabled.bat (resets the DNS Client to Disabled) [right-click and select: Save Target As]
To use: double-click on the downloaded file and reboot that's it ...
For all other Questions, Issues and Solutions - see: The HOSTS File FAQ
For detailed Download and Extract Instructions - see: Download Help
How To Uninstall the MVPS HOSTS file
Related Utilities
- SpywareBlaster can encrypt and create a backups of your HOSTS file.
- WinPatrol will allow you to lock your HOSTS file and will monitor changes.
- ZoneAlarm Pro and Security Suite users have a "Lock Hosts" file option.
However this requires special instructions to edit or update the HOSTS file.
HostsMan is a freeware application that lets you manage your Hosts file.
Includes an option to turn off the unneeded DNS Client Service.
This also has an option to update the existing HOSTS file when needed.
Important! - make sure you select: Default action - Overwrite
Use the Server option to replace the Action Cancelled message.Windows Vista users ... once installed right-click on "hm.exe" and select: Properties
Click the Compatibility tab and select: "Run as Administrator" [screenshot]
Rename the HOSTS file on the fly ... a simple one click batch file. (Win9x/XP/Vista) HostsXpert is a terrific multi-function Hosts File Manager [screenshot]
Note: no install required, it runs from anywhere ... when updating the HOSTS file make sure to use the Replace option, rather than Merge
Homer is a LocalHost webserver used to replace the Action Cancelled message.
Download a custom image for use in Homer.
Simply save (Save Target As) blocked.gif (2 kb) to the "\Homer\Homer\images\" folder.
Various Troubleshooting Articles
- You cannot modify the Hosts file in Windows Vista
- Options for Using the Ipconfig Diagnostic Utility (XP)
- WinME users - Start | Run (type) "winipcfg" (no quotes)
- "The Page Cannot Be Displayed" Error Message (XP) [more info]
- Error Message: The Page Cannot Be Displayed (98/ME)
- "The Page Cannot Be Displayed" Error Message (2K)
- Repairs Winsock 2 settings (usually spyware related)
- How to Reset Internet Protocol (TCP/IP) in Windows XP
- How to Troubleshoot TCP/IP Connectivity with Windows XP
How to Break into porn sites that accept checks
Bản tóm tắt này không có sẵn. Vui lòng
nhấp vào đây để xem bài đăng.
Change Your MAC Address in Windows
Change Your MAC Address in Windows
Đổi địa chỉ MAC trong Windows
Địa chỉ MAC là chuỗi 12-digit mà các wireless routers và các thiết bị mạng khác dùng để ngăn chặn hoặc mở truy nhập cho 1 máy tính. Đôi khi chúng cũng là 1 vết "xương" lớn. Nếu bạn đang chạy Windows, Online Tech Tips blog có 1 step-by-step tutorial hướng dẫn "đánh lừa - spoof" địa chỉ của bạn thành cái gì đó mà bạn có thể nhớ, hoặc truy nhập vào wireless network nào đó đã khóa. Bài viết dành cho Windows XP nhưng tương tự cho Windows Vista.
MAC addresses are the 12-digit strings that wireless routers and other network devices use to restrict or open up access to a computer. They're also a huge pain in the butt sometimes, requiring pen-and-paper maneuvers and frustrating connection attempts. If you're running a Windows system, the Online Tech Tips blog has a step-by-step tutorial on "spoofing" your address to something you can remember, or for hooking into a wireless network that's locked down. The guide is written for Windows XP, but the steps look much the same as they would in Vista.
http://www.online-tech-tips.com/computer-tips/how-to-change-mac-address/
Every network interface card (NIC) has a unique MAC Address (Media Access Control address). This applies to all types of network cards, including Ethernet cards and WiFi cards. The MAC Address is a six-byte number or 12-digit hexadecimal number number that is used to uniquely identify a host on an Ethernet network.
An example of a MAC address is 1F-2E-3D-4C-5B-6A and it falls into the Layer 2 networking protocol of the OSI model. In today’s networks, a MAC address is converted to a Layer 3 protocol address, such as an IP address, by ARP, or Address Resolution Protocol. Read my post on how to find your MAC address if you don’t know it.
All MAC Addresses are hard-coded into a network card and can never be changed. However, you can change or spoof the MAC address in the operating system itself using a few simple tricks.
So why would you want to change your MAC address? Well there are many reasons for this, mostly related to bypassing some kind of MAC Address filter set on a router or firewall. Changing the MAC Address can help to get you past some type of network restriction by emulating an unrestricted MAC Address or to get access by spoofing a MAC address that is already authorized.
For example, a WiFi network may allow only authorized computers to connect to the network and filters based on MAC address. If you can sniff out a legitimate MAC Address, you can then spoof your MAC address and gain access to the WiFi network.
Another example is if you have an ISP that allows only a certain number of computers to connect to the Internet from your home. If you have more computers that need to connect, you can spoof the MAC address of an authorized computer and connect from a different computer.
You can change the MAC Address on your network card pretty easily following the steps below:
Step 1: Click on Start, then Control Panel, then Network Connections, and right-click on the network connection you want to change the MAC address for and select Properties. It will normally either be Local Area Connection or Wireless Network Connection.

If you are using Windows Vista, you have to go to Control Panel, then Network and Internet, then Network and Sharing Center, and then Manage Network Connections.
Step 2: On the General tab, click the Configure button

Step 3: Now click on the Advanced tab and click on the “Locally Administered Address” property or the “Network Address” property.

By default, the “Not Present” value is selected. Go ahead and click on the Value radio button and enter in a new MAC address. The MAC address is a combination of 6 pairs of numbers and characters, i.e. 40-A2-D9-82-9F-F2. You should enter the MAC address without the dashes.

You can check that the MAC address has been changed by going to the command prompt and typing in IPCONFIG /ALL. Go ahead and restart the computer in order for the changes to take effect.
This is the simplest way to change your MAC address in Windows. You can also do so via the registry, but it’s much more technical and probably not required by most people.
How To Block Websites Without Software!
How To Block Websites Without Software!
Chặn các Websites không cần phần mềm!
Hướng dẫn:
1] Mở theo đường dẫn C:\WINDOWS\system32\drivers\...
2] Tìm file có tên là "HOSTS"
3] Mở nó lên bằng notepad
4] Ở dưới "127.0.0.1 localhost" thêm vào 127.0.0.2 www.sitenameyouwantblocked.com , khi đó site này sẽ không thể truy nhập được nữa !!!
5] Kết thúc!
-So-
127.0.0.1 localhost
127.0.0.2 www.blockedsite.com
-->www.blockedsite.com is now unaccessable<--
Cho mỗi site sau đó muốn thêm vào, thêm "1" cho số cuối trong dãy IP (vd 127.0.0.2).
IE: 127.0.0.3 www.blablabla.com
127.0.0.4 www.blablabla.com
127.0.0.5 www.blablabla.com
Chúc thành công và đừng dùng với mục đích phá rối !!!
Disable Autorun in Vista to Protect Against Malware Infections

Tất cả các phiên bản Windows hiện nay có tính năng được gọi là AutoPlay và AutoRun. AutoPlay cho phép bạn chọn chương trình nào được dùng cho các ứng dụng media, như là các CD/VCD/DVD chứa nhạc, video, phim, hoặc là hình ảnh. Lấy ví dụ, lần đầu tiên bạn nghe nhạc từ đĩa CD, nếu bạn có nhiều hơn 1 chương trình media player trên máy tính, AutoPlay sẽ hỏi bạn muốn dùng chương trình media player nào. Bạn có thể thay đổi "AutoPlay settings - Thiết lập Autoplay" cho mỗi loại media.

Autorun là cách để chạy nhiều chương trình hoặc nội dung nổi bậc (như là video trên đĩa CD nhạc) một cách tự động khi bạn bỏ đĩa CD hoặc cắm ổ USB vào máy tính. Khác với AutoPlay ở điểm này, nhưng kết quả là giống nhau, khi được đưa vào, đĩa CD hoặc ổ USB tự động bắt đầu dùng một chương trình nào đó để chạy ứng dụng. Autorun kết hợp chặt chẽ với loại media mà nó dùng và bạn không thể điều chỉnh nó.
Khi một đĩa được bỏ vào hoặc một ổ đĩa được kết nối với máy tính, Windows tìm file có tên là autorun.inf trong thư mục gốc - root directory của đĩa đó. Nếu tìm thấy, Windows thực thi theo hướng dẫn trong file đó mà không cần biết đó là gì (có thể là nhạc và cũng có thể là virus)!!!
Lấy ví dụ, một file autorun.inf trên một CD có thể gồm một dòng là "open=setup.exe". Có nghĩa là máy tính sẽ chạy một cài đặt ngay khi đĩa CD đó được bỏ vào.
Bây giờ tôi biết bạn đang nghĩ là tại sao không disable nó trong Control Panel.

và bạn có thể làm như thế. Nhưng ngay khi mở ổ đĩa từ from My computer hoặc Windows Explorer, Windows sẽ vẫn cứ chạy file autorun.inf !!!
Bạn có thể cũng tin là có thể tự bảo vệ đối với AutoRun bằng cách sửa lại 2 keys trong Registry là NoDriveAutoRun and NoDriveTypeAutoRun, but it has been shown that these keys can be overridden by a little-known registry key called MountPoints2 which contains cached information about every memory stick or other removable device that your PC has ever seen, and that overrides the NoDriveTypeAutoRun value if you insert a device which the PC already knows about.
The solution to this problem is to globally block autorun.inf files from executing without using the dialog boxes in Vista to do this. Here’s how:
- Start Notepad or any text editor.
- Copy the text below into the text editor, [everything between the square brackets should be all on one line]REGEDIT4
[HKEY_LOCAL_MACHINESOFTWAREMicrosoftWindowsNTCurrentVersionIniFileMappingAutorun.inf]
@=”@SYS:DoesNotExist” - Save it to your desktop as NoAutoRun.reg. Make sure the extension is .reg and not .txt.
- Right-click your new .reg file and choose Merge.
- If you are prompted for an administrator password or for a confirmation, type the password, or click Continue.
- Click Yes when you’re asked “Are you sure you want to add the information in C:NoAutoRun.reg to the registry?
Now the next time you insert a flash drive, CD, DVD, or other removable disc into your system, Windows will not execute the information in any autorun.inf file that may be present. The downside of this is that when you insert a CD or DVD with software on it, you have to find the setup program using My Computer or Windows Explorer and launch it yourself. But I think that’s a small price to pay for the increased security.
Copyright © VistaRevisited.com. All Rights Reserved.
RELATED POSTS:Gỡ bỏ phần mềm - How to Uninstall a Program
Làm thế nào để gỡ bỏ phần mềm Norton?
Bạn cần Product Key khi cài đặt lại phần mềm Norton. Hãy làm theo các bước trong hướng dẫn để sao lưu lại Product Key vì biết đâu sau này bạn lại cần nó. Mỗi phần mềm có hướng dẫn khác nhau, hãy lựa chọn đúng trước khi thực hiện.
Disable/Turn Off User Account (Access) Control (UAC) in Windows Vista
Source: http://www.tipandtrick.net/2008/ways-to-disable-or-turn-off-user-account-access-control-uac-in-windows-vista/
http://www.pcdoctor-guide.com/wordpress/?p=4641
http://www.pcdoctor-guide.com/wordpress/?p=4641
Ways to Disable or Turn Off User Account (Access) Control (UAC) in Windows Vista
User Account Control (UAC), or unknowingly mistaken as User Access Control is new security feature in Windows Vista. The main display of UAC is the occasional pop up dialog box asking for user’s permission needed by Windows or for user to enter administrator’s password to perform the operation or run a program especially setup executable, installer or system tools. UAC also affects command prompt (Cmd.exe) with errors such as “The requested operation requires elevation” or “Access Denied” when not running in elevated command prompt with full privileges.
The annoying symptom happens because User Account (Access) Control or UAC forces all processes to run in lower elevation mode with limited privileges. When a program or process requires access to system files, folders or registry hives that only administrator can access, UAC launch a consent prompt to allow user to give approval or enter administrator’s credential to higher elevation with full administrator’s rights.
For user who find the constant UAC elevation approval request annoying, and confident that you can maintain the security of computer from infection without the help of UAC, it’s possible to turn off and disable UAC. Turning User Account Control off potentially fix compatibility issue where UAC prevents some programs, applications, components, processes or games from running properly even if authorization is given to elevate its privileges, as delay in execution as may break certain real-time functions.
There are a few ways that you can use to turn off the UAC, but most home and personal users should find method to disable UAC via Control Panel easiest to do. User Account Access Control, when turned off and disabled., will affect all users on the computer.
Method 1 - Turn Off UAC via Users Accounts Control Panel
- Click Start and then open Control Panel.
- In the Control Panel, click User Accounts and Family Safety.

- Click User Accounts.

- Click Turn User Account Control on or off.

When prompted that Windows needs your permission to continue, press Continue button or enter the administrator’s password.
- Clear the tick or check mark on the check box beside the option to Use User Account Control (UAC) to help protect your computer.

- Click OK.
- When prompted that computer must be restarted to apply the changes, reboot the computer.
- To enable the UAC, simply tick or select the checkbox again.
Method 2 - Disable UAC Using Registry Editor
- Run Registry Editor by typing RegEdit in Start Search or command prompt.
- Registry Editor, navigate to the following registry key:
HKLM\Software\Microsoft\Windows\CurrentVersion\Policies\System
where HKLM is HKEY_LOCAL_MACHINE.
- Right click on EnableLUA registry subkey and choose Modify or double click on EnableLUA registry value name in the right pane to modify the setting.

- On “Edit DWORD (32-bit) Value” dialog box, set the new value data as 0.

- Exit from Registry Editor.
- Restart the computer.
- To enable the UAC again, simply change back the value data of EnableLUA to 1.
Method 3 - Turn Off UAC Using MSConfig System Configuration Utility
- Type MSConfig in Start Search box or Run command (open by pressing Win+R) and hit Enter key.
When prompted that Windows needs your permission to continue, press Continue button or enter the administrator’s password.
- In System Configuration window, click on the Tools tab.
- Scroll down and locate to select Disable UAP or Disable UAC option in the item list.

- Click the Launch button.
- A command prompt window will open and automatically execute and run scripted process to disable UAC.
- On completion, The operation completed successfully message will be shown. Close Cmd.exe window when done, and then exit form MSConfig.
- Restart computer for changes to apply and become effective.
- To return UAC to on status, simply select Enable UAP or Enable UAC, and then click on Launch button.
Method 4 - Disable UAC Using Group Policy (Active Directory GPO or Local Group Policy)
Note: Windows Vista Home Premium and Home Basic editions do not have Local Group Policy Editor.
- Click Start and then type GPEdit.msc in the Start Search box and hit Enter key to open the Group Policy Editor.
Note: If you’re using Active Directory Domain GPO which controls many computers, open Group Policy Management Console by click on Start, and then type GPMC.msc in the Start Search and hit Enter key from a Windows Vista computer that is a member of the AD domain. In the Group Policy Management Console (GPMC) window, browse to the respective GPO which is linked and enabled to the OU (organization unit) or domain where the Vista computers are located, then edit it.
- Navigate and browse to Computer Configuration -> Windows Settings -> Security Settings -> Local Policies -> Security Options.
- In the right details pane, there are a few User Account Control related policies. Right click each of the following policies and configure or change the value to the new value indicated below after the dash (-):
- User Account Control: Behavior of the elevation prompt for administrators - Elevate without prompting
- User Account Control: Detect application installations and prompt for elevation - Disabled
- User Account Control: Run all administrators in Admin Approval Mode - Disabled

- Restart the computer to make the changes effective.
- To re-turn on UAC, revert back to original values of the policies, which is Enabled and Prompt for Consent.
Method 5 - Disable User Access Control from Command Prompt
- Open an elevated command prompt.
- Run the following command to disable and turn off UAC:
C:\Windows\System32\cmd.exe /k %windir%\System32\reg.exe ADD HKLM\SOFTWARE\Microsoft\Windows\CurrentVersion\Policies\System /v EnableLUA /t REG_DWORD /d 0 /f - To re-enable and turn back on the User Account Control, run the following command:
C:\Windows\System32\cmd.exe /k %windir%\System32\reg.exe ADD HKLM\SOFTWARE\Microsoft\Windows\CurrentVersion\Policies\System /v EnableLUA /t REG_DWORD /d 1 /f - Reboot the computer for the changes to take effect.
Note: After disabling and turning off UAC, a red X shield icon of Windows Security Center will be displayed in the notification area (system tray). My Digital Life has the guide to remove the Windows Security Center warning icon and messages.
Related Articles
- User Name and Password Access Denied or Failed When Running VMWare Server 2.0 in Windows Vista
- Permanently Turn Off and Disable 64-bit (x64) Windows Vista Forced Driver Signature Signing with ReadyDriver Plus
- How to Disable Windows Vista CD/DVD Disc Burning/Recording Function
- How to Disable Windows Vista CD or DVD Drive Auto Eject or Open Feature
- Error 1721: There Is A Problem With This Windows Installer Package When Install or Uninstall on Vista
- Windows Server 2008 or Vista Activation Fails When Configure Third Party Firewall to Use HTTPS Authentication to Access Internet
- Bypass or Disable UAC for Selected Excluded Programs Only with Elevator (SkipUAC)
- Fix Setup Installer Package Access Denied Failure Error Code 0×80070005 (Or 5 Or 0×5)
- Workaround to Run VMWare Server on Windows Vista
- How Open Command Prompt as Administrator on Elevation in Vista
Where I find out Tips and Tricks on the Internet
http://www.tipandtrick.net/2008/ways-to-disable-or-turn-off-user-account-access-control-uac-in-windows-vista/
http://www.pcdoctor-guide.com/wordpress/?p=4641
http://www.online-tech-tips.com/computer-tips/how-to-change-mac-address/
http://www.pcdoctor-guide.com/wordpress/?p=4641
http://www.online-tech-tips.com/computer-tips/how-to-change-mac-address/
Đăng ký:
Bài đăng (Atom)